Showing posts with label paleo cooking. Show all posts

Tuesday, May 26, 2015

Whole30 Day 20 - A Quick & Easy Breakfast Recipe

Actually, this quick recipe idea can be used for any meal, not just breakfast. Who says eggs are only for breakfast...??? 


A yokey fried egg is my go-to sauce that can be put on top of almost anything. 


Today's Stats
Water Consumption:
120 oz - Just enough water

Sleep:
8 hours
I'm catching up on my sleep, by the end of this long weekend I will be back to normal:-)

Daily Meals:
7:30am - Coconut Milk Latte

10am - Duck Fried Egg & Veggie Leftovers

1:30pm - Fruit, Veggie, Avocado, Coconut Protein Smoothie

3pm- Handful Cashews & Beef Jerky

7:30pm - Mini Lamb Sliders wrapped in Cabbage and Roasted Brussel Sprouts & Beets


Sunday, December 28, 2014

Red Wine Braised Lamb Shanks - Another One Pot Wonder

Lamb shanks may look challenging to make, but they are actually easier than apple pie (especially for me since I don't bake often). The 3 points of performance when cooking lamb shanks are the following:

1. Season well, the seasoning is foundation for the dish.

2. Sear all over. 

3. Cook low & slow (it's a muscular part and takes awhile for the connective tissue to breakdown).  

Ingredients
- 1 shank person (I usually make extra for leftovers)
- 1 yellow onion, roughly chopped
- 10 garlic cloves
- 1 sweet potato, roughly chopped
- 1 jalapeño, chopped
- 1 leek, roughly chopped
- 5 carrots
- 5 celery stalks
- 3 cups red wine
- Seasoning: salt, peper, cumin, curry powder, paprika, turmeric
- Coconut, ghee, or lard (fat) for searing the shanks and sautéing the veggies

Red Wine Reduction Veggie Puree
- 2 to 3 cups braised veggies & drippings
- 8 oz coconut milk, canned

Instructions
1. Preheat the oven to 275 degrees

2. Completely season the shanks.


3. In a dutch oven (or cast iron skillet if you are using crock pot instead of the oven) heat fat over high and place shanks in pot.


4. Sear all sides and reserve the seasoned oil. 


5. Turn off heat and let cool. 


6. In the meantime, roughly cut up veggies.


7. Over medium heat sweat onions and garlic for about 5 minutes, until translucent.


8. Add the rest of the veggies in batches starting with the jalapeño, sweet potatoes, leeks, carrots, and celery. Add more fat if needed.


9. Add red wine and whisk in all the brown bits at the bottom of the pan.


10. Place lamb shanks back into the pot and add water until about halfway covered. 


11. Bring to a boil.


12. Place the lid on and put in the oven.


13. Cook in the oven at 275 for 3 hours. Since I wasn't home, I just left it in the oven until I got home which was about 6 hours. If you don't have that much time to cook and let simmer for dinner you can cook it at a higher temperature for shorter time (325 degrees for 3-4 hours or 375 for 2-3 hours).


14. Cooking the lamb shanks low and slow will result in liquid evaporation and meat shrinkage, another thing to keep in mind when determining how much to cook per person. 


15. To make the Red Wine Reduction Veggie Puree, add the braised veggies and drippings to the food processor and puree.


16. Slowly pour in the coconut milk and puree until silky smooth.


17. Serve on top of a bed of mixed greens and top with braised veggies and the Red Wine Reduction Veggie Puree.


Try this recipe out the next time you have a dinner party or just cooking for two...don't be afraid to cook enough to have leftovers... 

I used my leftover the next day in a cast iron skillet hash with a few fried eggs on top...

Thursday, November 20, 2014

My Passion to be the Next Food Network Star & Video Audition...


My passion to be the Next Food Network Star started 8 years when I first starting watching the show...since then I haven't missed an episode...

The first year I applied I didn't really have a COV (Culinary Point of View), I just wanted to teach people how to cook for a healthy lifestyle...Back then I was co-founder of a loose leaf tea and Steepware company (The Tea Spot) and was in charge of sales, marketing & PR...To help grow brand awareness, increase sales and fuel my passion to teach people how to cook, I held cooking with tea classes at numerous retail outlets and grocery stores we sold to...Here's me at Whole Foods Market, with a tea-licious frittata I taught people how to cook:-)


For my Oolong Infused Prosciutto & Veggie Frittata and other recipes, visit my Tea Spot Chef Blog...It's been dormant since 2011), but there are many recipes to explore there!!!

I even found my second home video audition for Next Food Network Star from 2009...Click here to check it out...WOW, I must say, my COV and presence on camera has evolved for the better...If I was picked back then, Suzie & Bob would've voted me right off...

Anyhow, since 2007 I've religiously applied to the Next Food Network Star. The majority of the applicants would've given up by now, but not me. People who know me, know I am very determined when I want something. I knew that if I developed my cooking skills and my COV then they would eventually pick me. So at the age of 31 I applied for a loan to attend the Culinary School of the Rockies (now known at Escoffier)...My schedule during that time was crazy...waking up at 5am to teach fitness classes, trying to launch a tea company during day and going to culinary school at night...Hardly spending anytime with my husband or friends, but I had a dream and I knew it was going to take a lot of hard work and long hours to accomplish it. And I knew I needed these skills if I was ever selected as a contestant for the Next Food Network Star...

Being in the Specialty/Natural Foods industry you meet a lot of people...In 2011, I met Guy, an unforgettable 'guy' who won season 2 of the Food Network Star, see photo above. He was at the Fancy Foods Show launching his salsa line...I told him I keep auditioning to NFNS and he told me to keep trying...Although I did't need to hear that from him, it was definitely reassuring...I even recreated one of Guy's salsas, Tea Twisted Guy's Salsa Verde, in appreciation for his inspiration...  

Two years ago I auditioned in NYC and got a call back. It was the Friday before Thanksgiving, and they needed me to submit my home video and some other info by Monday so they can review it...I had two days to script, film, edit, and cook...Although it wasn't a bad video, my COV didn't have any substance and I didn't really connect with the camera...Check it out HERE and see for yourself...

Fast forward to the present, it's 2014 and season 11 casting is underway. I'm very focused (some might say obsessed) to make it this year. Usually, I wait until the last minute to apply and I either apply at a open casting call or by application or a home video submission...Not this year...

This year I attended 2 open casting calls (Austin & Miami), an application, and submitted a home video with help from my friend Jeanne Eisenhaure, founder of 23Sons...Thank you Jeanne, you rock!!! I can't believe it's your first video...


I'd love to hear your feedback, especially on my COV - Primal Eats...

FYI: the video can only be 3 minutes, not much time...

You want the Spaghetti Squash Recipe...???

Lamb Meatball recipe coming soon...

Wish me luck, I have a follow-up meeting with their casting team tomorrow...

Wednesday, October 29, 2014

Celery Root...Learn How to Cut and Cook this Scary Knob...

Celery root...
What's that???
What does it taste like??? 
Why would I cook it???
How do I cook it???


Celery root is not the root of celery you usually buy, it's slightly different. The green stalks are more bitter and pungent. I'd use them for stocks, braising and pesto-like sauces. The actual celery root has a starchy consistency and tastes like a combination of jicama, rutabaga and daikon. Because of it's starchy consistency it gives creaminess purees, crunchiness in slaws, tenderness to braises and crispiness to fried goodness.  

The real question is how to cut it... 

Just like the butternut squash, this ingredient can be intimidating because it looks scary...'how the F(&(*^&^ do you get inside'...


Just like the butternut squash, we need to make it cuttable (stable to cut the 'thing' instead of your figure)...

Start by cutting one end.

 Cut the other end.

 Stand it up so it's stable. Take your knife and peel the skin.


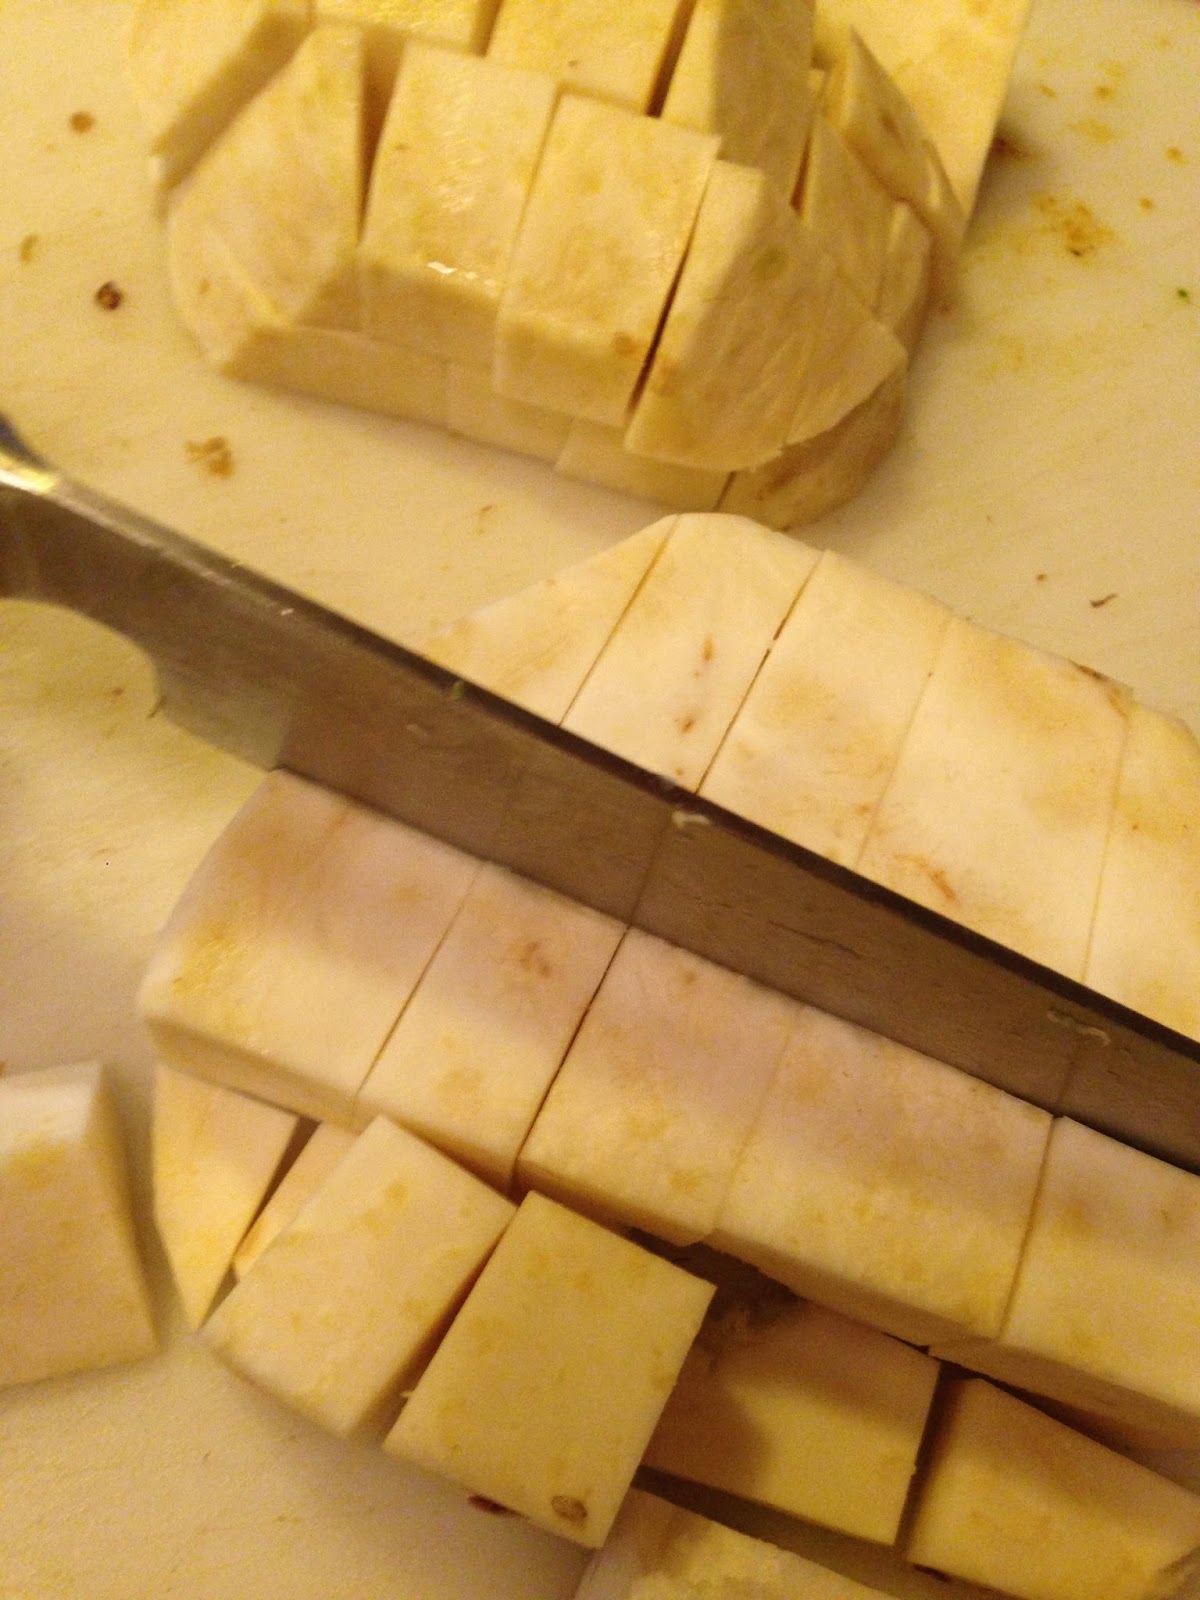
Slice down the middle, 1/4 inch between slices.


Stack a couple of slices on top of each other. Cut lengthwise and then across, making cubes. If you want to make celery root fries, just cut lengthwise so they are long and tender.


I used this celery root in my famous pork green chile with hominy and butternut squash... 


But there are so many other uses for this ridiculous root...
1. Celery french fries
2. Celery root puree
3. Celery root soup
4. Celery in homemade stock
5. Celery root slaw
6. Celery mash potatoes
7. Celery root hash
8. (Celery) Root Cakes

I can go on...do you have any ideas...

Butternut Squash...Learn How to Cut & Cook This Awkward Bundle of JOY...

Don't be intimated by butternut squash! The most challenging thing is cutting it up, but if you know the right steps and have to a sharp knife, you should be good to go.


Although butternut squash is available all year round it's really a fall/winter squash. Look for one with a big neck and small bulb; it'll yield the most meat. It should have a pale orange color and should feel heavy for its size.


To cut, place it on its size.


Cut the stem end off.


Cut the bottom off.

Cutting off both ends makes it stable to stand it up and cut through the middle.


You seed it now and bake it, but I want to cook it a little faster so I cut it into quarters. 


Flip it upside down, making it more stable, and cut through center. 


Seed the squash. 

You can reserve the seeds, rinse, dry, season and bake them if you'd like. They are a great snack or garnish.  


Bake at 350 degrees, 5-7 min.


Spray butternut squash with (coconut) oil. 


Season with salt, pepper, chile powder, curry powder a touch of cinnamon and nutmeg.


Bake at 350 degrees for 30-40 minutes. Add a little water at the bottom of the baking sheet to help steam the squash and not burn the skin.


Enjoy!!!

There are other numerous ways to enjoy this fabulous fall squash...
1. Top with some ground meat and sautéed peppers
2. Cut into pieces and add to my famous Green Chile, click HERE for recipe
3. Puree into a butternut squash mash and garnish with seeds & bacon bits
4. Make into butternut squash soup
5. Puree and use to fill raviolis
6. Make into butternut squash cakes
7. Use as a filling in enchiladas

Anybody else have other ideas...???

Sunday, October 12, 2014

Another One Pot Wonder - Short Ribs with Veggie-licious Puree

The difference between Rib Eye Steaks and Short Ribs...


As you can see from the image above, Rib Eye Steaks are taken from the top of the cow and Short Ribs are taken from the short plate of the cow which is at the bottom portion. Every part of the cow require different cooking techniques. Ribeye Steaks can be grilled, seared, baked. Usually a more expensive piece of meat, Ribeye Steaks are really easy and quick to cook. CLICK HERE for a delicious Ribeye Steak Recipe.
Short Ribs on the other hand, take longer to cook because there is more connective tissue that needs to be broken down which means a low and slow cooking technique like braising. This is why this recipe is another one of my One Pot Wonders.


Ingredients
- 2.5 lbs Short Ribs, preferably grassfed & finished
- 1 large yellow onion, roughly chopped
- 6 garlic cloves
- 1 jalapeño, chopped (seeded if you don't want too much heat)
- 5 carrots, roughly chopped
- 1 bunch celery, roughly chopped
- 2 medium sweet potatoes, roughly chopped
- 1 large red beet, roughly chopped
- 1 celery root, roughly chopped
- 4 tomatoes, roughly chopped
- 2 cups white wine vinegar
- 6 cups stock or water, warm
- 2 TBS tomato paste
- 2 TBS Coconut Oil
- Seasoning: Salt, pepper, garlic powder, onion powder, garam masala, cayenne, turmeric, tarragon


Instructions
1. Pre-heat oven to 425 degrees.

2. Place all seasonings in a bowl. I like to layer the spices in order of most used to least used, starting with the salt as being most used in this case.


2. Completely cover the short ribs with seasoning.


3. Heat pot on high. Add coconut oil and move it around so the bottom is completely coated. Place short ribs in pot.
  

4. Sear all sides of short ribs and remove from pot. 


Note: A dark film will form when searing. This is called fond and is full of flavor...I'm very FOND of the FOND...


6. Add the veggies to the pot and stir, using the fond to coat them. 


7. Mix in the tomato paste. Push all the veggies over to one side, making room for deglazing the fond.


8. Add vinegar and stir the veggies.


9. Add the warm stock or water.


10. Whisk the bottom and all the sides incorporating all the 'FOND' flavor, HA!HA!


11. Place the short ribs back into the pot to braise. The liquid should cover the meat about 3/4 from the top. Bring the liquid to boil and cover. 


12. Place in the oven. As you can see I'm serving with spaghetti squash. The sauce from this recipe is remarkably hearty and pairs great with spaghetti squash.


13. After 30 minutes decrease oven temperature to 275 degrees and cook for 4-5 hours. Flip meat over to the other side after cooking for 3 hours. Much of the liquid will evaporate so add more if needed. 


14. After fork tender, remove meat from pot, cover with foil and reserve.


Get ready, we are about to make magic by transforming the leftover juices and braised veggies into a Veggie-licious hearty sauce...


15. With a slotted spoon scoop the veggies out of the pot and place them in a food processor. Reserve the liquid. 


16. Gradually add the reserved liquid as the veggies puree.


 17. The puree should be slightly thick and very smooth, similar to the consistency of pancake batter.


18. Place the puree back into the pot. Add the short ribs and coat with puree. Put back into the oven  and cook at 275 degrees for another 1 hour.


ENJOY!!!!